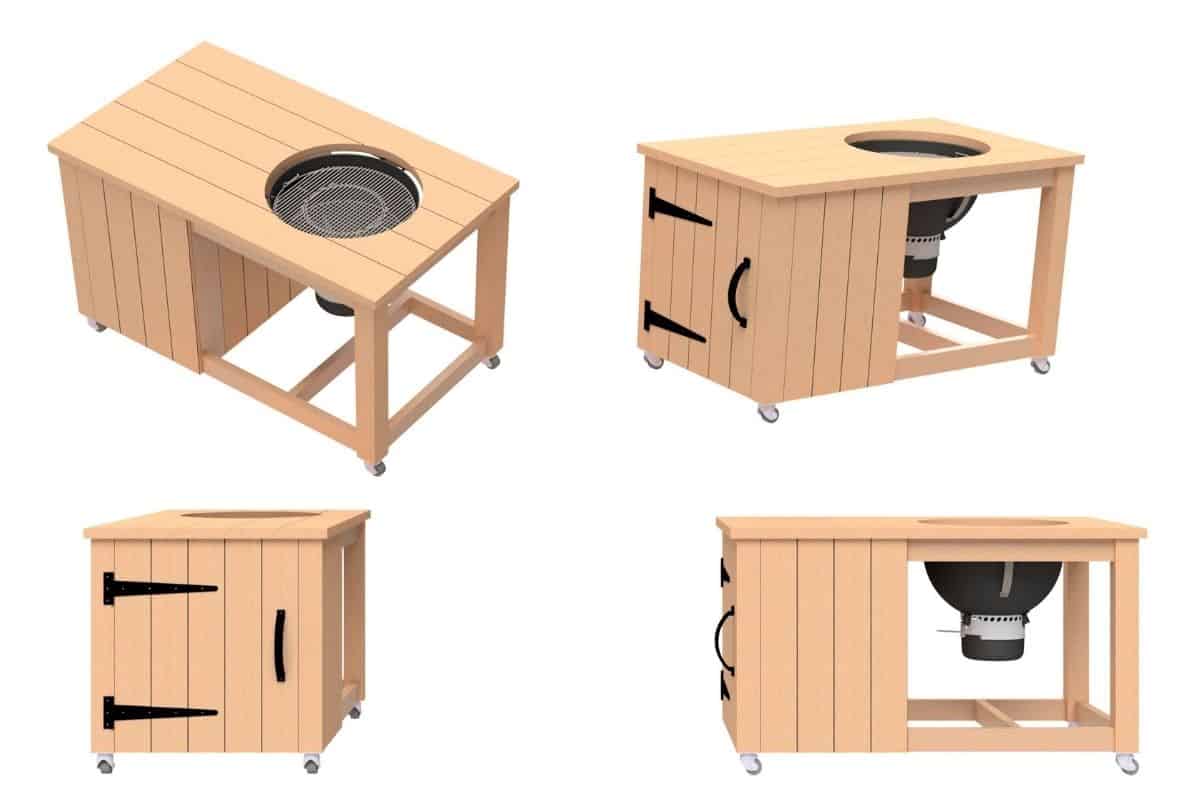
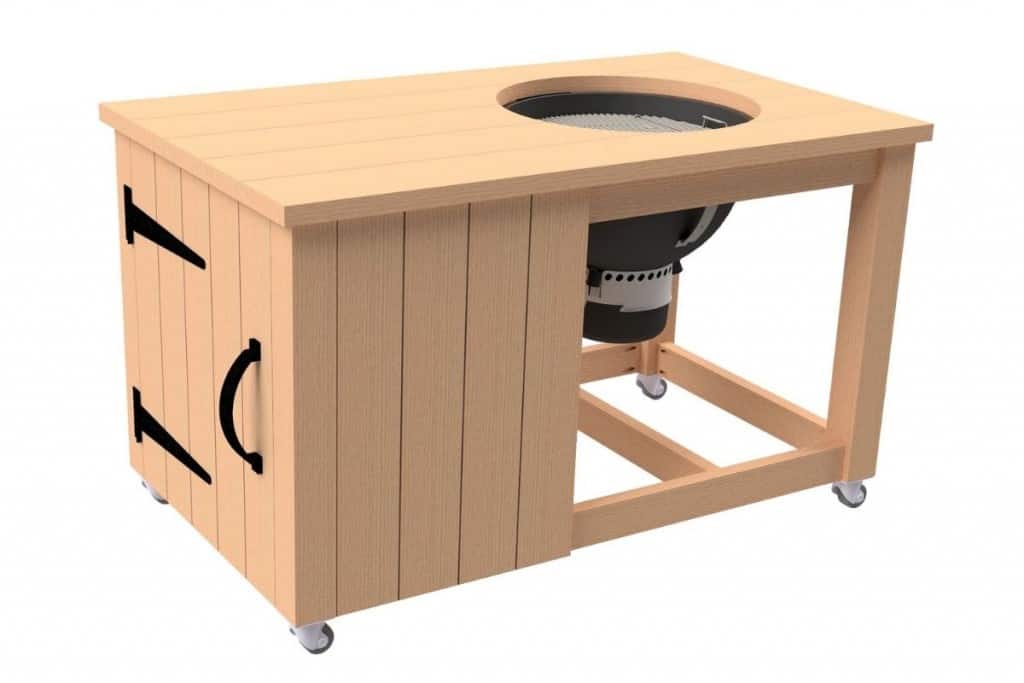
Take your kettle grill to the next level with these free grill cart plans. With the added convenience of a large worktop and massive storage capacity you can get the most out of your humble kettle.
Kettle grills are possibly one of the most popular grills on the market. Although fairly simple in design they are incredibly versatile. Whether you’re looking to BBQ low and slow or grill hot and fast they have you covered.
The only problem with some of the more basic models, like the classic Weber original or master touch, is a lack of work surface to prepare your food for the grate.
While some more expensive models offer a work top, like the Weber Performer series, for me they still tend to be fairly small compared to what you really need.
Storage can be another issue when you’re an outdoor cooking nut. If you’re not careful you can end up with accessories all over the yard. The two-shelf cupboard in my grill cart takes care of this.
With a capacity of slightly over 9 cubic feet of storage, there’s plenty of room for everything from your charcoal and smoking wood, to your kebab skewers and rotisserie.
So, what are you waiting for? Read on to learn how you can build your very own 22” kettle grill cart.
What You’ll Need.

Materials
The type of wood you use is totally up to you but if you want something that’s going to last more than just a couple of seasons you’re going to want to look at using cedar as a minimum.
If you want to build something that will stand the test of time you might be better off using Redwood or even Teak. Although they come in at a higher price the longevity of your grill cart should more than make up for this initial outlay.
I’ve added 10% for wastage when calculating the overall lengths of lumber we’ll need. You might want to add a little more or less depending on the cost and quality of lumber you end up using.
Remember, when using dimensional lumber as I have here the dimensions are generally ½” smaller than quoted i.e. for 2×4” dimensional lumber it actually measures 1 ½ x 3 ½”. Double check the actual dimensions of your lumber and adjust the dimensions of the plans accordingly. I’ve added the actual dimensions of the lumber I’ve used in this design in brackets in the list below.
Dimensional Lumber
- 2×4 (1 ½” x 3 ½”) pressure treated lumber – Total: 42’ 6” or 1 off 6’, 1 off 8’ and 3 off 10’ lengths.
- 2×2 (1 ½” x 1 ½”) pressure treated lumber – Total: 3’ 10” or 1 off 6’ length.
- 4×4 (3 ½” x 3 ½”) pressure treated lumber – Total: 11’ 9” or 1 off 12’ length.
- 1×6 (¾” x 5 ½”) pressure treated lumber – Total: 18’ or 7 off 12’ lengths.
- 2×8 (1 ½” x 7 ¼”) pressure treated lumber – Total: 28’ 5” or 3 off 12’ lengths.
Additional Hardware
Fasteners
- Box of 1 ½” timber screws
- Box of 2 ½” timber screws
- A pack of 1 ½” long finishing that are compatible with your finishing nailer (optional)
Tools
- Power saw: circular saw, miter saw or table saw
- Jigsaw
- Drill & drill bits
- Impact driver and driver bits
- Corner clamps
- Pocket hole jig and drill bits
- Finish nailer (optional)
- Sand paper
Step 1: Grill Cart Frame


To start with we’re going to need to assembly the frame of the grill cart. The whole frame is constructed from 4×4 uprights in each corner with 2×4 cross members. In order to screw the frame together I’ve opted for a simple yet effective and sturdy method, pocket screws.
They offer the ability to produce a strong join while concealing the fixings, leaving everything looking clean and tidy. If you’re not familiar with pocket screws take a look at the video below.
Start by cutting all of the lumber you need for the frame:
- 4 off 2×4 – 27 ½” long.
- 4 off 2×4 – 53” long.
- 4 off 4×4 – 32” long.
- 3 off 2×4 – 30” long.
One you have all your lumber cut, assemble the outer frame first using corner clamps to help keep everything square.
Each of the 16 positions where a length of 2×4 is fixed to a 4×4 should be flush with the top or bottom of the 4×4 and set back ¾” from the outside of the frame.
Use your pocket hole jig to drill 2 pocket holes for each join and fix in place using 2 ½” timber screws.
Once the outer frame is assembled, go about fixing in place each of the inner cross members in the positions shown in the drawing above. Again using pocket holes, but this time secure in place using 1 ½” timber screws.
Step 2: Storage Cupboard Body


Next up you’re going to need to assemble the body of the storage cupboard. The body is made up from a total of 14 lengths of 1×6 cut 32” long. 2 of the boards will need the corners cut out so they can fit over the cross members running along the length of the frame.
Start by cutting 14 lengths of 1×6 32” long using your preferred power saw. Next cut the corners out of 2 of them following the drawing above.
Once you have all your boards cut fasten them to the frame. If you have a finish nailer then fix each piece into the 2×4 cross members, top and bottom, using 2 finishing nails in each position.
If you don’t have a finish nailer follow the previous step but replace the finishing nails with 1 ½” timber screws. It’ll take a little longer but they’ll do the same job.
Step 3: Storage Cupboard Shelves and Door


Now you have your frame and cupboard body you’re going to need a door for it. The door is pretty simple to construct and is simply made from 5 lengths of 1×6 32” long and 2 length of 2×4 26” long.
Start by cutting your lumber with your chosen power saw, and assemble according to the drawing. Fix together using either finishing nails or 1 ½” timber screws. Then set the door aside until you’ve fitted the cupboard shelves.
For the bottom shelf, start by cutting 5 33” lengths of 1×6. With one of the lengths you’ll need to cut it along the length so it’s 2” wide. I’d suggest doing this with a table saw, or a circular saw with a guide to make sure it’s dead straight.
With another piece of you 1×6 you’ll need to cut out the corners similar to before. The dimensions for the cuts are shown in the drawing above. Once you have each of your pieces of timber cut, screw them into the cross members of the frame using 1 ½” timber screws or finishing nails if you prefer.
To fit the top shelf you’ll first need to cut 2 lengths of 2×2 21” long. Screw them into the inside of the cupboard body, 10 ½” above the bottom shelf, using 1 ½” timber screws. Make sure they’re level from front to back or you’ll have a slope to your shelf.
For the top shelf you’ll need to start by cutting 4 lengths of 1×6 33” long. This time you’ll need to trim one of them down to 4 ¾” to fit. Fasten each board into the 2×2 supports as before.
Now the shelves are done, it’s time to fit the door. Hang the door using shed hinges, and fit the handle. Just make sure you screw the hinges in line with the 2×4 timber on the back of the door for maximum strength. Also be sure you hang the door the right way up otherwise it won’t close.
We want a nice tight fit but you may need to rub some areas down with sand paper to get that perfect close.
Step 4: Fitting the Worktop


Onto the worktop. The worktop is made up from 5 62” inch long lengths of 2×8. Start by cutting each piece to length. When it comes to cutting the hole for the grill, you would attempt to mark out and cut each piece of 2×8. For me however there’s a risk of being slightly out and things not quite lining up.
Instead start by screwing your worktop down to the frame first. Start by screwing one of the edge pieces down so it hand over the frame by 1” on each end and ⅞” at the side. Clamp it in place to make sure it doesn’t move around and fix it to the frame using 2 ½” timber screws.
Then onto the next board. Line it up at both ends with your first board and clamp in place. You might also find it necessary to clamp the boards together across the width of the worktop. This will only be required if the boards have warped or aren’t perfectly straight, you want to try to avoid any gaps between your boards.
Once you’re happy with the position screw the second board in place. Continue these steps until all your boards are screwed in place.
For the hole to mount your grill, mark out a point 19 ½” inches in from the opposite end to your cupboard and 18 ⅛” in from the side. Next draw a circle 23 ⅝” in diameter with your mark as the center point. This can be done using a compass if you have one big enough. Alternatively you can use a piece of the string with a nail tied to one end and a marker tied to the other. Hammer the nail into your center mark and draw your circle with the marker.
Once you have your circle marked out, drill a hole the size of your jigsaw blade close to, but inside your line. Cut around the circumference of your circle following the line as close as you can. Once the cut is done, tidy up any rough areas with some sand paper.
Step 5: Fitting your Kettle Grill
Your cart is pretty much done, the only other thing to do first is to fit the caster wheels. Simply tip your cart on it’s side and screw the casters into the center of each 4×4 upright using 2 ½” timber screws.
Finally it’s time to fit your grill. To keep things simple I went ahead and used some purpose made kettle table mounting brackets. There’s not alot to consider here, basically work out the height you want your kettle to sit and screw the brackets into your kettle and worktop.
Bare in mind however, drilling into your kettle will void any warranty. So you might want to think twice before drilling into your brand new master touch premium and pick up a second hand 22” kettle instead.
Wrapping Up
I hope you like my 22” kettle grill cart plans and found them useful in helping you build your very own. The convenience that comes with that massive worktop and storage cupboard take the humble kettle grill to the next level.
As always, your questions and comments are welcome, just like you’re welcome to share plans and any other articles from the site with friends. Speaking of friends, come join the crowd on my social channels – you’ll find links on this page.
Thanks for reading, and I wish you well with your next DIY or woodworking project!